The Easiest Kubernetes Installations Ever: Unveiling Distros Side by Side
Embarking on a journey through the Kubernetes universe? Brace yourself as we explore the diverse landscapes of K0s, K3s, microk8s, and minikube - each carrying its unique charm and
Embarking on a journey through the Kubernetes universe? Brace yourself as we explore the diverse landscapes of K0s, K3s, microk8s, and minikube - each carrying its unique charm and capabilities. 🌌
No specific order or preference, just ordered by "size", at least in the name of the distro, from the smallest to the biggest: 😁
-
K0s, "a zero-friction Kubernetes" - was first released in November 2020.
-
K3s, "a lightweight Kubernetes" - It was officially released on Feb. 26, 2019.
-
microk8s, "a minimal production Kubernetes" - Canonical released MicroK8s in December 2018.
-
Minikube, "a single node Kubernetes" - the first released Jul 26, 2016, not tagged as
Pre-Releasewas v0.7.0.
From the above, we can see which one is the oldest, and which one is the newest. But the burning question remains - which one takes the crown? 🤔
Let's decipher the wisdom behind each:
-
Minikubestrikes first, capturing the hearts of developers for local environments and PoCs for a long time. -
K3sandmicrok8sjoin the brawl, competing fiercely for the title of the best "distro for IoT or Edge". Their lightweight nature and easy installation make them front-runners. -
And then, there's the newcomer -
K0s. A game-changer with its unique feature: a control plane capable of adding worker nodes across different existing servers or new VMs with only the SSH keys! Is this the future? 🚀- Check minute 29 at this Podcast: Exploring K0s with Jussi Nummelin of Mirantis
Introduction
There are multiple ways to install these distros, I am going to use multipass because it is the easiest way to get started and to run multiple VMs on my laptop. I am going to use the same VM's flavors for all the distros, so I can compare them side by side.
How did I get here?
Almost 4 years ago (Q4Y19), when I started to learn Kubernetes, I had to install a couple of Vanilla Kubernetes clusters on an air-gapped environment, on RHEL 7.9, from this kind of environment you don't have access to the Internet, so you have to download all the binaries and images from a machine with Internet access, and then copy them to the air-gapped environment, this is tedious and error-prone. Several colleagues and other vendors' consultants had tried to install Kubernetes, but they failed, I had to explain to them multiple times how to do it, and even I created an internal Wiki page with the instructions, but they still failed, so, almost 2 years later I had to create some scripts to automate the process and I decided to share the knowledge and create a guide and a video to show how to install (a Vanilla) Kubernetes cluster on Ubuntu.
Now, these popular distros sell the idea of being easy and simple to install, I am going to guide you through the installation process of each and share with you the scripts I used to automate this, I am going to use the same VM flavors for all of them, so I can compare them side by side. Ready? Let's go! 🚀
Setting the Stage: Multipass and Lab Environment
Before we dive into the installations, let's set the stage with Multipass - a lightweight VM manager for Linux, Windows, and macOS. With Multipass, we'll unleash the power of Ubuntu environments with a single command. Ready to compare these distros side by side? Let's roll! 🕹️
Check the official reference on how to Install Multipass; Linux, macOS, and Windows are supported.
⚠️ Tweak for multipass instead of ssh
Because I am using the default cloud-init file the instances are created with the default user ubuntu, but this user is not allowed to connect via SSH because has no password defined, you have to do this step manually and I prefer not to overcomplicate the process, so either:
🐚 I need to use the multipass shell command to connect to the instances and execute the commands from the instance terminal;
▶️⚡ or I can and I prefer to use the multipass exec command to execute commands in the instances from my local, this is similar to the docker exec and kubectl exec command, but for VMs and I will use it instead of ssh $ssh_user@$host 'bash -s <SCRIPT_HERE>' to execute my scripts from the instances.
💡 You can use the
sshcommand above if not usingmultipass.
I encourage you to check the steps on each distro below, and after understanding you can check and download the scripts to install the Kubernetes distros.
Multipass References:
The Lab Environment
System Requirements
Below is a table with the minimum requirements for each distro based on the official documentation.
| Distro | CPU | RAM | Disk |
|---|---|---|---|
| K0s | 1 | Controller 1 GB | |
| Worker 0.5 GB | Controller ~0.5 GB | ||
| Worker ~1.3 GB | |||
| K3s | 1 | 512 MB | 5 |
| microk8s | 1 | 540MB | 20G |
| minikube | 2 | 2G | 20G |
Definitely, minikube is the most resource-hungry distro, but it is the oldest one, so it is understandable, maybe it was never intended to be used in IoT or Edge environments, but it is a great option for developers in their PCs, laptops, and PoCs.
There is this requirements comparison done by our friends at Canonical, but it doesn't match the official documentation, so I am going to challenge some of these requirements, and I am going to use the same VM flavors with only 1 CPU, 1GB of RAM, and 5GB of disk space; challenge accepted! 🤓
Remember, the best tool to use depends on your specific needs and the resources available in your lab environment.
K0s
K0s is a "zero-friction Kubernetes" distribution that is designed to work on any infrastructure: public cloud, private cloud, and air-gapped environments. It is a single binary that is designed to be as easy as possible to install and upgrade.
Installation
Control Plane
# download the K0s binary
curl -sSLf https://get.k0s.sh | sudo sh
# install K0s
k0s install controller --enable-worker
systemctl daemon-reload
k0s start
# check the status
k0s status
k0s kubectl get nodes
watch 'k0s kubectl get pod --all-namespaces'
k0s kubectl get nodes
# create a token to join workers to the cluster
k0s token create --role=worker > token-file
Worker Nodes
On each of the worker nodes, run the following commands:
# download the K0s binary
curl -sSLf https://get.k0s.sh | sudo sh
# install K0s
k0s install worker --token-file token-file
systemctl daemon-reload
k0s start
# check the status
k0s status
K0s extra references
-
Creating a K0s cluster with an Ansible Playbook - As per the author, based on the K3s Ansible Playbook.
K3s
K3s is a lightweight Kubernetes distribution that is designed to work on any infrastructure: public cloud, private cloud, and air-gapped environments. It is a single binary that is designed to be as easy as possible to install and upgrade. It is a fully compliant Kubernetes distribution with no breaking changes from upstream Kubernetes.
Installation
Control Plane
curl -sfL https://get.k3s.io | sh -
# Check for Ready node, takes ~30 seconds
k3s kubectl get nodes
# Check for Ready pod, takes ~60 seconds
watch 'k3s kubectl get pod --all-namespaces'
# get the token to join workers to the cluster
cat /var/lib/rancher/k3s/server/node-token
In the K3s architecture, master nodes are called server nodes and worker nodes are called agent nodes. The server and agent are combined into a single binary, called k3s. The server is started with the --server argument, and agents are started with the --agent argument. The server and agent can be combined into a single node, or run on separate nodes.
Joining nodes: NODE_TOKEN comes from /var/lib/rancher/k3s/server/node-token on your server.
Worker Nodes
To install agent nodes, run the following command on each node:
curl -sfL https://get.k3s.io | K3S_URL=https://k3s1-rebelion:6443 K3S_TOKEN=mynodetoken INSTALL_K3S_EXEC="agent" sh -
Notes (from the official documentation):
- A
kubeconfigfile will be written to/etc/rancher/k3s/k3s.yamland thekubectlinstalled by K3s will automatically use it.
Troubleshooting
agent node is not joining the cluster
It seems that by default the agent node tries to connect to the Load Balancer, generating a Timeout error and failing to connect to port 6444, but if you are using a single server node, you don't need the Load Balancer, so you need to start the agent node with the agent and the --disable-apiserver-lb flags, like this:
sudo k3s agent --server https://k3s1-rebelion:6443 -t $token --disable-apiserver-lb > /dev/null 2>&1 &
The server node gets stuck
Another issue I had was that the agent node was not able to connect to the server node, so I had to increase the resources of the server node, and then the agent node was able to connect to the server node. (Just the memory, not the CPU or disk space)
multipass stop k3s1-rebelion
multipass set local.k3s1-rebelion.memory=2G
#multipass set local.k3s1-rebelion.cpus=2
#multipass set local.k3s1-rebelion.disk=10G
multipass start k3s1-rebelion
Reference:
-
Increase resources https://multipass.run/docs/modify-an-instance
-
https://github.com/k3s-io/k3s/issues/4839 - This was not my case but seems to fix the issue for some people, so I am including it here just in case.
K3s extra references
microk8s
Multiple ways to install microk8s.
MicroK8s installations come with Calico as the default CNI, dqlite for the datastore and an opinionated set of default arguments for the Kubernetes services. MicroK8s is a conformant upstream Kubernetes deployment that is designed for simplicity and is optimized for developer experience.
"MicroK8s runs in as little as 540MB of memory, but to accommodate workloads, we recommend a system with at least 20G of disk space and 4G of memory."
Installation
Control Plane
#install snapd
apt update
apt install snapd
#install microk8s
snap install microk8s --classic
# one step further, getting the token to join the cluster

# Run the command and store the output
output=$(microk8s add-node)
# Extract the second line
join_command=$(echo "$output" | sed -n '2p')
echo $join_command --worker
Worker Nodes
#install snapd
apt update
apt install snapd
#install microk8s
snap install microk8s --classic
#join the cluster
microk8s join <BASED_ON_OUTPUT_IN_CONTROL_PLANE_SERVER> --worker

microk8s kubectl get nodes
To add a new node to the cluster you need to run the microk8s add-node command on the control plane server, and then run the output of that command on the worker node and must be done on every worker node you want to add to cluster, because the output of the microk8s add-node command is different for each worker node.
One thing I noticed in the microk8s documentation and didn't see in the other distros is that you can remove nodes from the cluster easily, this is great for testing purposes, of course, you can do it in the other distros, but you have to do it manually, in microk8s you can do it with a single command:
microk8s leave
microk8s extra references
minikube
minikube is a tool that makes it easy to run Kubernetes locally. Minikube runs a single-node Kubernetes cluster inside a VM on your laptop for users looking to try out Kubernetes or develop with it day-to-day.
Installation
Control Plane
# install minikube
curl -LO https://storage.googleapis.com/minikube/releases/latest/minikube_latest_amd64.deb
sudo dpkg -i minikube_latest_amd64.deb
# start minikube
minikube start
# check the status
minikube status
alias kubectl="minikube kubectl --"
kubectl cluster-info

# check the nodes
kubectl get nodes
# check the pods
watch 'kubectl get pod --all-namespaces'
You need to have a driver installed and docker is the preferred one, so you need to install docker first, and then minikube will use it as the driver.
If you are considering a clean VM, the minikube installation process is the most complex of all the distros, but it is still easy to install, and it is the oldest one, so it is understandable.
The great thing is that I am using multipass, so the easiest way to have a minikube instance is to create the multipass VM pre-built with minikube, nothing else! 🤯
The VERY bad part is that minikube VM image requires at least 2 CPUs, 4GB of RAM, and 40GB of disk space, huge compared to the other distros! 😱
# create the VM with minikube pre-installed
multipass launch --name minikube-rebelion -c 2 -m 4G -d 40G minikube
# check the status
multipass info minikube-rebelion
Minikube must be created with at least 2 CPUs, otherwise, you will get this error: launch failed: Requested Number of CPUs is less than Blueprint minimum of 2
With at least 4GB of RAM, otherwise, you will get this error: launch failed: Requested Memory size is less than Blueprint minimum of 4G
And with at least 40GB of disk space, otherwise, you will get this error: launch failed: Requested Disk space is less than Blueprint minimum of 40G
Worker Nodes
⚠️ While Minikube does have a --nodes flag that allows you to specify the number of nodes, these nodes are still all running within the same server/virtual machine, not in separate VMs, which is what we want to test in this lab.
If you need a multi-node Kubernetes cluster in your lab, definitely the other distros are better options or using a Vanilla full-fledged Kubernetes installation with multiple VMs.
Minikube extra references
Taking a Break: Comparing the Distros Installation
Based on previous experiences, I was expecting to have some issues with the installation of these distros, but I was surprised that all of them were installed without any issues, and they were installed in less than 5 minutes each. My verdict is that all of them are easy to install, but I am going to give the crown to K3s because the process was the easiest and had fewer steps to follow, second place goes to microk8s because it was also easy to install, but it has more steps to follow, and third place goes to K0s because it has more steps to follow, and it is not as easy as the other two, but it is still easy to install.
From my point of view, the installation of these distros is not a problem, the problem is the complexity of the Kubernetes ecosystem, and the lack of a good developer experience, but that's a topic for another post. 😁
Airgap Installation
As I explained in the introduction, I started generating content not only because of the Kubernetes complexity per se, but also because of the extra complexity of installing it on air-gapped environments; back in those days, there were no tools to help you with that type of installation, so I had to create the scripts to automate the air-gap installation process, nowadays, all these distros have a way to install them on air-gapped environments:
K1s and K1sT
K1s, a serverless Kubernetes (not distro per se, but is my baby so I'm including it 😁. You will love it too!). This Kubernetes cluster is a fully compliant Kubernetes API that allows you to run any Kubernetes API calls for you to experience the kubectl command line tool or client API calls, it is a simulator for newbies to learn Kubernetes, and for experienced users to test their scripts and tools with no breaking changes from upstream Kubernetes.
K1sT, a Kubernetes CLI for developers, for everyone. It is a tool that makes it easy to interact with Kubernetes clusters and manage your workloads more efficiently and productively.
Flight test them and let me know what you think! It is a work in progress (alpha for early adopters), but it is already usable and is free! 🧑🏽💻
I am preparing a video to show you how to use them, and how you can connect to all your Kubernetes clusters with no hassle, using the previous distros as an example, so stay tuned! 📰
Comparing the Distros Resources Usage
multipass info --all | grep -E "Name|Load|CPU|Mem|Disk"
# or formatted as a table (markdown)
echo -e "| Name | CPU | Load | Disk | Memory |\n| --- | --- | --- | --- | --- |"
multipass info --all | grep -E "Name|Load|CPU|Mem|Disk" | awk -F: '{split($0,a,":"); printf("|%-10s ", a[2])} END {print "|\n"}' | column -t
# just one VM as an example
multipass info primary | grep -E "Name|Load|CPU|Mem|Disk" | awk -F: '{split($0,a,":"); printf("|%-10s ", a[2])} END {print "|\n"}' | column -t
# comma separated format for easy copy/paste in a spreadsheet
multipass info primary | grep -E "Name|Load|CPU|Mem|Disk" | awk -F: '{split($0,a,":"); printf("%-10s, ", a[2])} END {print "\n"}' | column -t
multipass info command documentation here.
Side by Side Comparison
| Name | CPU | Load | Disk | Memory |
|---|---|---|---|---|
| primary | 1 | 0.00 0.00 0.00 | 1.8GiB out of 4.7GiB | 185.3MiB out of 892.2MiB |
| k0s1-rebelion | 1 | 0.58 0.83 1.27 | 3.3GiB out of 4.7GiB | 744.7MiB out of 892.2MiB |
| k0s2-rebelion | 1 | 0.00 0.00 0.00 | 2.6GiB out of 4.7GiB | 321.9MiB out of 892.2MiB |
| k0s3-rebelion | 1 | 0.01 0.04 0.01 | 2.6GiB out of 4.7GiB | 324.8MiB out of 892.2MiB |
| k3s1-rebelion | 1 | 0.02 0.06 0.02 | 2.2GiB out of 4.7GiB | 739.4MiB out of 1.9GiB |
| k3s2-rebelion | 1 | 0.00 0.00 0.00 | 2.2GiB out of 4.7GiB | 275.6MiB out of 892.2MiB |
| k3s3-rebelion | 1 | 0.01 0.00 0.00 | 2.1GiB out of 4.7GiB | 300.5MiB out of 892.2MiB |
| microk8s1-rebelion | 1 | 0.39 0.22 0.20 | 3.5GiB out of 4.7GiB | 809.1MiB out of 1.9GiB |
| microk8s2-rebelion | 1 | 0.00 0.02 0.03 | 3.3GiB out of 4.7GiB | 326.7MiB out of 892.2MiB |
| microk8s3-rebelion | 1 | 0.00 0.00 0.00 | 3.3GiB out of 4.7GiB | 324.3MiB out of 892.2MiB |
| minikube-rebelion | 2 | 0.32 0.39 0.38 | 8.8GiB out of 38.6GiB | 1.5GiB out of 3.8GiB |
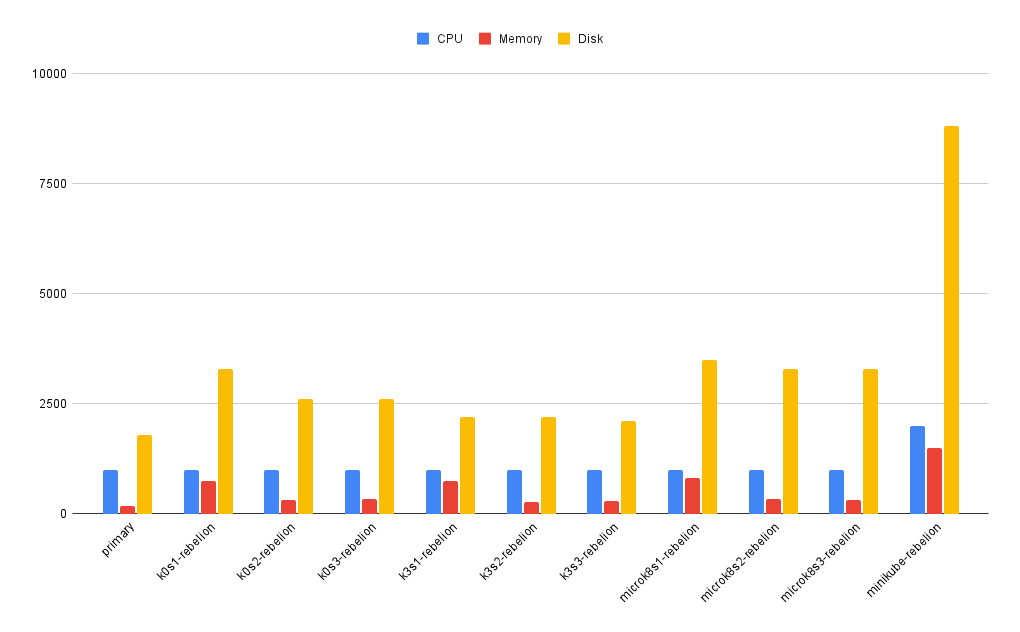
Kubernetes distros resource usage.
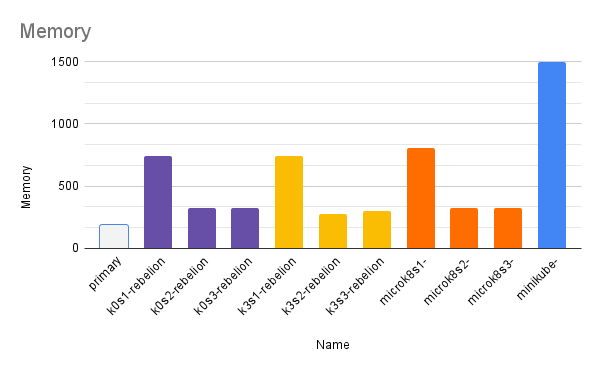
Kubernetes distros memory usage.
Observations
-
Minikubeis the most resource-hungry distro, but it is the oldest one, so it is understandable, maybe it was never intended to be used in IoT or Edge environments, but it is a great option for developers in their PCs, laptops, and PoCs. -
Regarding resources needed, the other distros run smoothly with only 1 CPU, 1GB of RAM, and 5GB of disk space.
-
I had to increase memory on the master nodes for
K3sandmicrok8sbecause the agent nodes were not able to connect to the server node, but that was the only issue I had and it was intermittent, so I am not sure if it was a real issue or just hiccups in my laptop due to the resources available and other processes running in the background (plenty of browsers and tabs open, and other apps running 😜). -
K0sbased on this experiment is the easiest to install;k3swas the most difficult to install and I am not convinced that the final installation I did on the agents/worker nodes was the right one, but it worked, if you want to go further you may need to investigate more and tweak the installation process I showed you above. -
I will let you do the homework to compare the performance of these distros, I am not going to do it, but I am sure you can do it and share your results with me and the community. 😁
Bonus - Automating the Installation
You can either use the official Ansible Playbook for K3s and K0s, or you can use the following scripts I have created for you to install the distros, I am going to use the scripts to remove any additional complexity in installing Ansible, and external dependencies (Ansible, Python, and external libraries), and extra resources (CPU, RAM, and disk space) that you may need to install the distros.
Launch Multipass VMs, just in case you need it
# bash shell (Linux, macOS, WSL)
# A single command line to launch 3 VMs, with the names of the VMs for our lab (k0s1, k0s2, k0s3, k3s1, k3s2, k3s3, microk8s1, microk8s2, microk8s3, minikube)
for i in {1..3}; do multipass launch --name k0s${i}-rebelion -c 1 -m 1G -d 5G; multipass launch --name k3s${i}-rebelion -c 1 -m 1G -d 5G; multipass launch --name microk8s${i}-rebelion -c 1 -m 1G -d 5G; done
# minikube doesn't support multiple VMs, so we are going to launch only one VM
multipass launch --name minikube-rebelion -c 1 -m 1G -d 5G

# PowerShell (Windows), same as above 3 VMs per distro
for ($i=1; $i -le 3; $i++) { multipass launch --name k0s$i-rebelion -c 1 -m 1G -d 5G; multipass launch --name k3s$i-rebelion -c 1 -m 1G -d 5G; multipass launch --name microk8s$i-rebelion -c 1 -m 1G -d 5G; }
# minikube doesn't support multiple VMs, so we are going to launch only one VM
multipass launch --name minikube-rebelion -c 1 -m 1G -d 5G
# command prompt (Windows)
for /L %i in (1,1,3) do multipass launch --name k0s%i-rebelion -c 1 -m 1G -d 5G & multipass launch --name k3s%i-rebelion -c 1 -m 1G -d 5G & multipass launch --name microk8s%i-rebelion -c 1 -m 1G -d 5G
# minikube doesn't support multiple VMs, so we are going to launch only one VM
multipass launch --name minikube-rebelion -c 1 -m 1G -d 5G
🐧 Enjoy coding, enjoy life, go Rebels! ✊🏽 ☁️ 🚀
References and Resources
🚀 Scripts to automate the Kubernetes distros installation.
📖 La Rebelion Blog. ✊🏽
📽️ Full video
👉 Subscribe to "La Rebelion" community for more tech insights, tutorials, and breakthroughs.
💻 K1s Terminal simplifies Kubernetes and Cloud-Native Operations.