Simplifying Remote Access to Kubernetes API Server
Are you grappling with the challenge of accessing the Kubernetes API server from a remote machine? 🤔 Don't worry; I've got you covered! In this guide, we'll demystify the process
Are you grappling with the challenge of accessing the Kubernetes API server from a remote machine? 🤔 Don't worry; I've got you covered! In this guide, we'll demystify the process and provide you with practical solutions to enable seamless remote access to the Kubernetes API server.
Below are the steps and a video demoing the commands needed, but before, some basic concepts. 👀
Understanding the Hurdle
So, you've installed the Kubernetes API server on a remote machine, only to hit a roadblock - you can't access it remotely! 😩 But why is that? By default, Kubernetes clusters are configured to restrict access to the API server from the local machine for security reasons. This limitation aims to prevent unauthorized manipulation of the cluster's state or resources.
The Importance of Remote Access
Accessing the Kubernetes API server from a remote machine is crucial for effective cluster management. This server serves as the primary interface for managing the cluster and its resources. Whether you're deploying applications, updating configurations, or monitoring cluster health, remote access is indispensable.
Overcoming the Challenge
Now, let's delve into solutions to overcome this hurdle and enable remote access to the Kubernetes API server securely:
-
Utilize
kubectl: The ubiquitouskubectltool allows seamless interaction with the API server from the command line, making it a go-to choice for many users. -
Leverage Proxy Mode: Running
kubectlin proxy mode is recommended for secure access. By using this mode, you can authenticate and encrypt connections to the API server, ensuring data integrity and confidentiality. -
Explore Official Client Libraries: These libraries offer automated discovery of the API server and streamlined authentication mechanisms, simplifying remote access for developers.
-
Direct REST Calls: For advanced users, direct access to the API server via REST calls provides granular control and flexibility, although with additional complexity.
Configuring a cluster for External Access
The easiest way for me to demonstrate how to configure a cluster for external access is by using Microk8s, because is an easy-to-install Kubernetes distribution and I can start a new instance in seconds using Multipass for me to show you how to configure it for external access. You can read my step-by-step guide and watch my video demo on how to install Microk8s and other Kubernetes distros on Ubuntu (with multipass).
I am going to provide a step-by-step guide on how to configure Microk8s for external access. This will include using a cert file, a token, and the Microk8s RBAC Addon.
But before starting, let's clarify an essential aspect: how users are authenticated to the Kubernetes API server, understanding how users are authenticated to the Kubernetes API server is crucial for configuring remote access effectively. Let's delve into this important aspect to clarify any misconceptions and ensure smooth configuration.
Authenticating Users to the Kubernetes API Server
Before diving into remote access configuration, it's essential to grasp how users are authenticated to the Kubernetes API server. This knowledge forms the foundation for setting up kubeconfig files and authentication tokens correctly.
:::note 💡 Insight
Many users often conflate the user parameter in the kubeconfig file with a user in the system. However, it's vital to clarify: the user specified in the kubeconfig file isn't a system user but rather a credential holder for accessing the Kubernetes API server. Think of it as a placeholder for authentication tokens or certificates.
:::
Understanding the Distinction
The user parameter in the kubeconfig file serves as a reference point for authentication, linking to the corresponding authentication credentials. These credentials can include authentication tokens, client certificates, or other authentication mechanisms supported by Kubernetes.
Clarifying Misconceptions
It's common for users to misconstrue the user parameter as a representation of system users. However, it's essential to dispel this confusion. The user specified in the kubeconfig file solely facilitates authentication to the Kubernetes API server and doesn't correspond to a user in the underlying system.
... say what!? 😲

Don't take my words, from the oficial documentation: "Kubernetes does not have objects which represent normal user accounts. Normal users cannot be added to a cluster through an API call."
To better understand the user authentication process, let's explore how the Kubernetes API server validates user credentials and facilitates secure access to the cluster using certificates.
Understanding Certificates in Kubernetes
In Kubernetes, certificates play a crucial role in authentication and secure communication between components. Let's delve deeper into how certificates function and how they facilitate user authentication within the Kubernetes ecosystem.
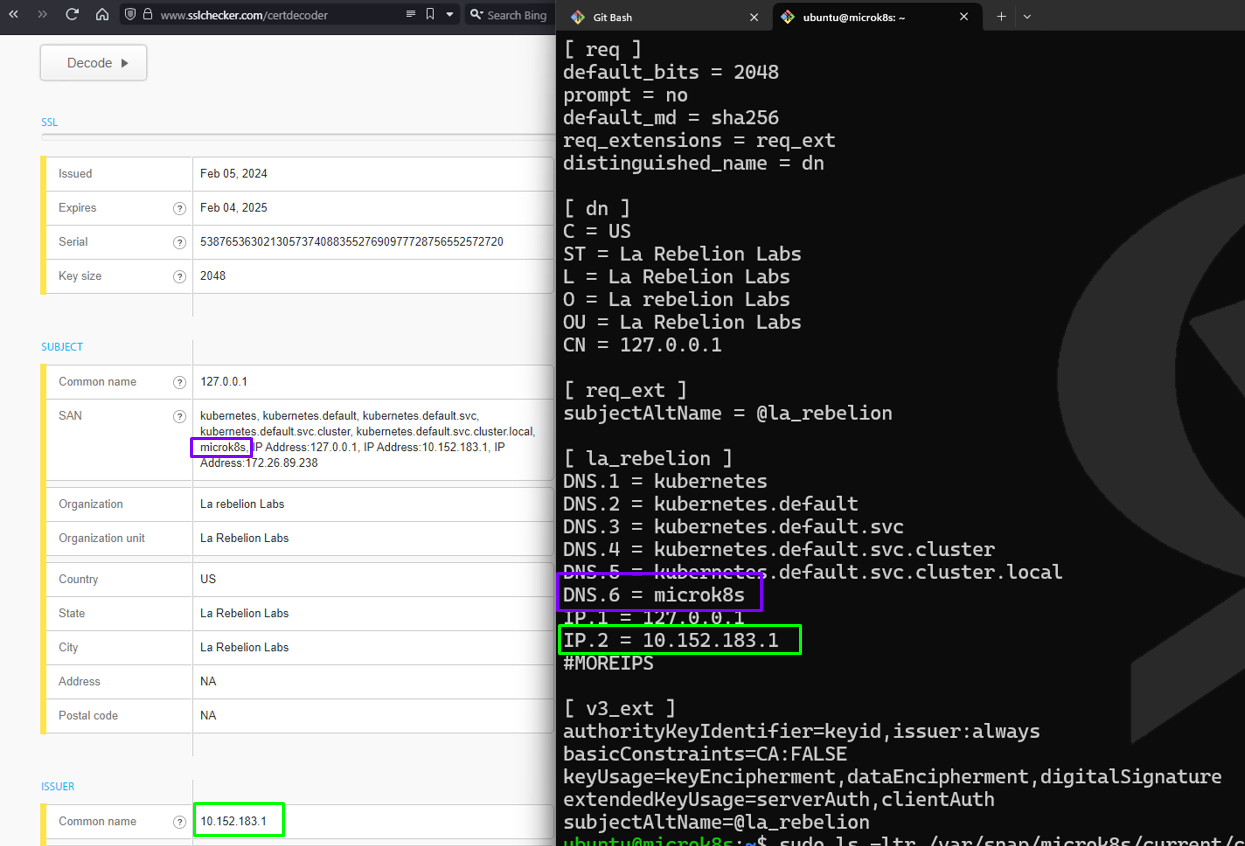
The server certificate is used to authenticate the Kubernetes API server to clients, ensuring secure communication. This certificate is signed by the cluster's certificate authority (CA) and is presented to clients to verify the server's identity.
Certificate Authentication Process
-
Certificate Generation: When a user requests access to the Kubernetes cluster, a certificate signing request (CSR) is generated. This request includes information about the user, such as their identity and permissions. For example, let's consider a user named Bob who wants access to the cluster.
-
Certificate Signing: The CSR is submitted to the Certificate Authority (CA) for validation. The CA verifies Bob's identity and signs the certificate if the request is legitimate. Once signed, the certificate becomes a trusted credential for Bob's authentication within the cluster.
-
Certificate Presentation: Upon attempting to access the Kubernetes cluster, Bob presents his signed certificate to the Kubernetes API server for authentication. The server recognizes the certificate as a valid credential signed by the cluster's CA.
-
Validation and Authorization: The Kubernetes API server validates Bob's certificate by verifying its signature against the CA's public key. Additionally, it extracts the Common Name (CN) field from the certificate's subject, which serves as Bob's username ("
/CN=bob"). This CN field acts as the identifier for Bob within the cluster. Once authenticated, the Kubernetes API server evaluates Bob's permissions based on configured RBAC policies to determine his access level.
Example, a certificate for Bob:

Significance of Common Name (CN) and User Configuration
The CN field in Bob's certificate serves as his unique identifier within the Kubernetes cluster. Interestingly, the CN field eliminates the need to specify Bob's username in the kubeconfig file explicitly. Instead, it's inferred from the CN field during certificate authentication.
However, including Bob's username in the kubeconfig file is still necessary. Why? Because it allows for the grouping of Bob's credentials and cluster information to create a context. This context enables seamless interaction with the cluster without the need to repeatedly specify authentication details. In essence, the kubeconfig file serves as a convenient repository for managing authentication credentials and cluster configurations, but it doesn't represent system users it can be Bob, Alice, or any other username you want, remember, only the CN field is used for authentication.
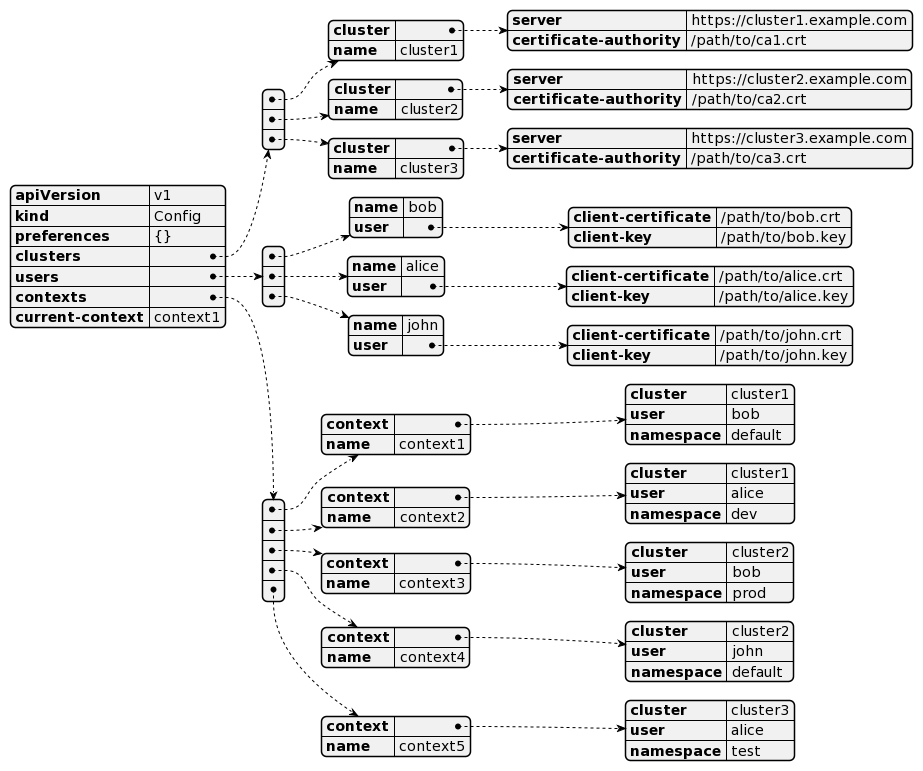
The above image is just an example to illustrate that users, context, and cluster could be mixed in the kubeconfig file, of course, if you have the appropriate configuration in the servers as well (RBAC, certs).
Configuring Authentication
When configuring remote access, users typically specify authentication details in the kubeconfig file, including authentication tokens or paths to client certificates. This ensures secure and authorized access to the Kubernetes API server from remote machines.
Best Practices for Secure Authentication
To enhance security, it's recommended to use RBAC (Role-Based Access Control) policies to restrict user actions and enforce authentication mechanisms such as token-based authentication or client certificate authentication.
By understanding how users are authenticated to the Kubernetes API server and clarifying misconceptions surrounding the kubeconfig file, users can configure remote access more confidently and securely.
Configuring Microk8s for External Access
With a clear understanding of user authentication mechanisms, users can navigate remote access configurations with confidence and precision. By adhering to best practices and leveraging the flexibility of kubeconfig files, seamless and secure access to the Kubernetes API server from remote machines becomes achievable.
Hands-on Configuration
Too much information, let's simplify it and provide a step-by-step guide on how to configure Microk8s for external access. This will include using a kubeconfig file, a token, and the Microk8s RBAC Addon.
So, armed with this knowledge, let's proceed with configuring remote access to the Kubernetes API server and harness the full potential of Kubernetes for your applications and infrastructure management needs.
Using a kubeconfig file steps
Let's see how to use a kubeconfig file to access the Kubernetes API from a remote machine.
- Copy the microk8s client
kubeconfigfile to the remote machine/PC (or your multipass host in my example).
scp /var/snap/microk8s/current/credentials/client.config <username>@<remote-machine>:~/.kube/config
# we are using multipass here
multipass transfer <multipass-instance-name>:/var/snap/microk8s/current/credentials/client.config ~/.kube/microk8s-config
Under /var/snap/microk8s/current/credentials/ you can find the client.config kubeconfig file used by microk8s kubectl. You can always generate a new client certificate for new users (CN) using openssl.
- On the remote machine, set the
KUBECONFIGenvironment variable.
export KUBECONFIG=~/.kube/config
- Test the connection
kubectl get nodes
# also, you can use the `--kubeconfig` flag if you want to use a different kubeconfig files
kubectl get nodes --kubeconfig ~/.kube/microk8s-config
Using a token steps
If you want to use a token to access the Kubernetes API, you can create a token using the following command
kubectl -n default create serviceaccount rebel-sa --server=https://microk8s:16443 --kubeconfig ~/.kube/microk8s-config
kubectl create token rebel-sa --kubeconfig ~/.kube/microk8s-config --server=https://microk8s:16443 -ndefault
You can then get the token using the following command
TOKEN=$(kubectl create token rebel-sa --kubeconfig ~/.kube/microk8s-config --server=https://microk8s:16443 -ndefault)
You can then use the token to access the Kubernetes API from a remote machine using the following command:
K8S_API_SERVER_IP=microk8s
K8S_API_SERVER_PORT=16443
# with curl
curl -k -H "Authorization: Bearer $TOKEN" https://${K8S_API_SERVER_IP}:${K8S_API_SERVER_PORT}/api/v1/namespaces/default/pods
# with kubectl
kubectl get pods --token=$TOKEN --server=https://${K8S_API_SERVER_IP}:${K8S_API_SERVER_PORT} --insecure-skip-tls-verify=true
Static Token File with tokens in /var/snap/microk8s/current/credentials/known_tokens.csv
Using microk8s RBAC Addon
Microk8s has a Role-Based Access Control (RBAC) addon that can be used to secure access to the Kubernetes API server. The RBAC addon allows you to define roles and role bindings that specify what actions a user can perform on a resource. You can use the RBAC addon to create a user with limited access to the Kubernetes API server.
To use the RBAC addon, you need to enable it using the following command:
microk8s enable rbac
You can then create a user rebel with limited access to a rebelion namespace with the following commands:
cat <<EOF | kubectl apply -f -
apiVersion: v1
kind: Namespace
metadata:
  name: rebelion
  labels:
    name: rebel
EOF
Now, we need to define a role and a rolebinding for the user rebel:
cat <<EOF | kubectl apply -f -
kind: Role
apiVersion: rbac.authorization.k8s.io/v1
metadata:
  namespace: rebelion
  name: rebel-role
rules:
- apiGroups: [""]
  resources: ["pods"]
  verbs: ["get", "list", "watch"]
EOF
cat <<EOF | kubectl apply -f -
kind: RoleBinding
apiVersion: rbac.authorization.k8s.io/v1
metadata:
  name: rebel-rolebinding
  namespace: rebelion
subjects:
- kind: User
  name: rebel
  apiGroup: rbac.authorization.k8s.io
roleRef:
    kind: Role
    name: rebel-role
    apiGroup: rbac.authorization.k8s.io
EOF
# generate a certificate signing request (CSR) for the user `rebel`
openssl genrsa -out rebel.key 2048
openssl req -new -key rebel.key -out rebel.csr -subj "/CN=rebel/O=app1/O=app2"
sudo openssl x509 -req -in rebel.csr -CA /var/snap/microk8s/current/certs/ca.crt -CAkey /var/snap/microk8s/current/certs/ca.key -CAcreateserial -out rebel.crt -days 3
# create a kubeconfig file for the user `rebel` and the `rebelion` namespace,
# and set the `KUBECONFIG` environment variable or use the `--kubeconfig` flag
kubectl get pods --kubeconfig ~/.kube/microk8s-config-custom
Bonus: Adding the self-signed certificate to the client machine
If your certificate authority (CA) is not signed by a trusted certificate authority, you can use the --insecure-skip-tls-verify flag to skip the certificate verification.
You can pass the CA certificate to the client machine using the --certificate-authority flag.
kubectl get pods --certificate-authority=/path/to/ca.crt
Or, to accept the certificate, you can add the certificate to the certificate store of the client machine.
# copy the certificate from the microk8s machine to the client machine
MULTIPASS_INSTANCE_NAME=microk8s
multipass exec $MULTIPASS_INSTANCE_NAME -- sudo cp /var/snap/microk8s/current/certs/ca.crt ~/microk8s-ca.crt
multipass transfer MULTIPASS_INSTANCE_NAME:~/microk8s-ca.crt .
sudo cp ./microk8s-ca.crt /usr/local/share/ca-certificates/microk8s-ca.crt
sudo update-ca-certificates
Conclusion
Accessing the Kubernetes API server remotely doesn't have to be an insurmountable challenge. With the right tools and configurations, you can unlock the full potential of your Kubernetes cluster from anywhere, ensuring seamless management and monitoring.
So, are you ready to take control of your Kubernetes cluster, no matter where you are? Let's embark on this journey together towards efficient cluster management and enhanced productivity! 🚀
Frequently Asked Questions
How do I access the Kubernetes API server? You can access the Kubernetes API server using tools like kubectl or by making direct REST calls.
What is the best way to secure remote access to the API server? Using kubectl in proxy mode ensures secure, authenticated, and encrypted connections to the API server.
How can I configure Kubernetes for external access? By adjusting Kubernetes configurations, you can enable external access to the Kubernetes API server, facilitating remote management tasks.
What are the best practices for securing access to the Kubernetes API server? Leveraging RBAC (Role-Based Access Control) policies and using secure authentication mechanisms such as tokens or client certificates are essential best practices for securing access to the API server.
How does the user parameter in thekubeconfig file relate to system users? The user parameter in the kubeconfig file is solely a reference for authentication credentials and doesn't correspond to system users. It's essential to clarify this distinction to avoid misconceptions.
What are the benefits of using Microk8s for remote access to the Kubernetes API server? Microk8s provides a lightweight and easy-to-install Kubernetes distribution, making it ideal for development and testing. By configuring Microk8s for external access, users can harness the power of Kubernetes from remote machines seamlessly.
🔗 Resources
📖 La RebelionBlog. ✊🏽
👉 Subscribe to "La Rebelion" community for more tech insights, tutorials, and breakthroughs.
💻 K1s Terminal simplifies Kubernetes and Cloud-Native Operations.
Let's innovate together! 🌟💡